Single Sign-on (SSO) is a one-step user authentication process. If you are the admin of a HelpDesk account, you can set up SSO with the identity providers (IdP) of your choice. Your technicians can access HelpDesk using the IdP credentials without another password to manage.
Admin of a HelpDesk account can configure SSO to access HelpDesk by signing in to a central identity provider. To set up SSO, you need to first configure your identity provider and then configure your HelpDesk account.
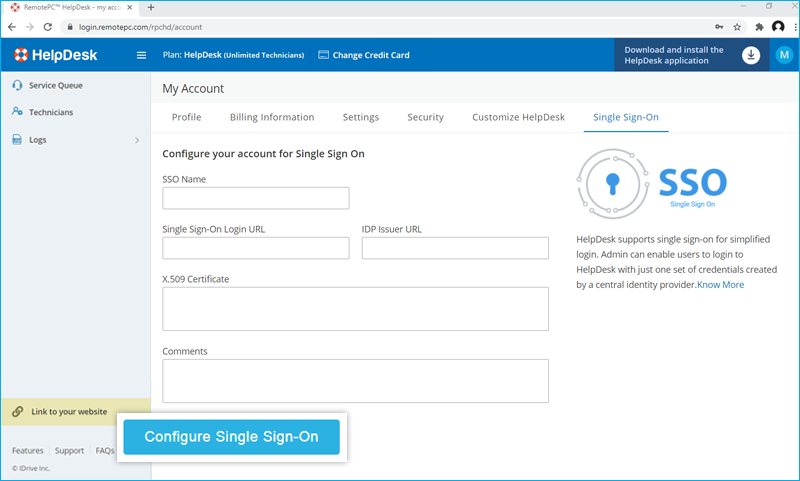
To configure SSO for your HelpDesk account,
- Login to HelpDesk via web browser.
- Sağ üst köşede görüntülenen kullanıcı adına tıklayın ve 'Hesabım'a tıklayın.
- 'Çoklu Oturum Açma'ya tıklayın.
- SSO profiliniz için bir ad girin.
- URL'leri girin ve IdP'nizden alınan X.509 sertifikasını ekleyin.
Not: X.509 sertifikası yalnızca .pem veya .cer biçiminde olmalıdır. - 'Tek Oturum Açmayı Yapılandır'a tıklayın.
SSO etkinleştirildiğinde bir e-posta alacaksınız.
Admin of HelpDesk accounts can either select SSO for login while inviting technicians to create an account or enable SSO for existing technicians.
To invite technicians to use SSO,
- Log in to HelpDesk via web browser.
- Go to the 'Technicians' tab and click 'Add'.
- Enter the email address in the 'Email Address' field.
- Select group and other preferences for the technician.
- 'SSO'yu Etkinleştir'i seçin.
Note: If you select the checkbox, technicians won't have to set a password for their account.
- 'Davet Et' seçeneğine tıklayın.
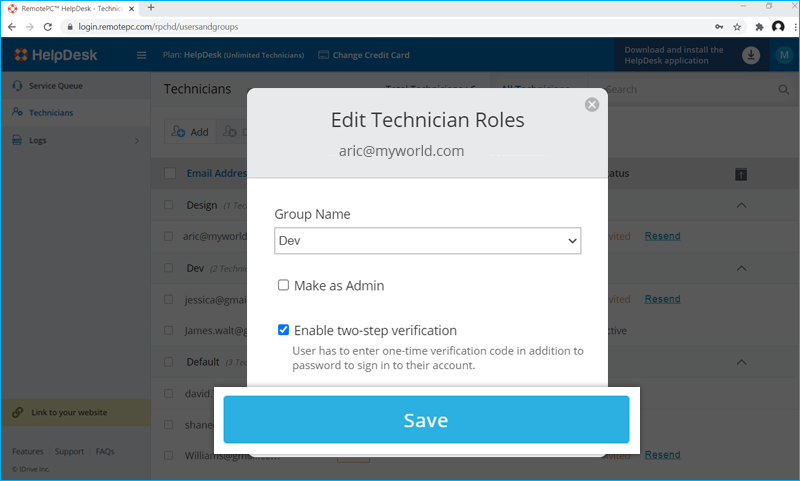
To enable SSO for existing technicians,
- Login to HelpDesk via web browser and go to the 'Technicians' tab.
- Hover on the technician you want to edit and click
 .
. - 'SSO'yu Etkinleştir'i seçin.
- 'Kaydet'e tıklayın.
Evet, yöneticiler bir SSO profilini hesaplarından kaldırabilir.
SSO profilini kaldırmak için,
- Login to HelpDesk via web browser.
- Sağ üst köşede görüntülenen kullanıcı adına tıklayın ve 'Hesabım'a tıklayın.
- 'Çoklu Oturum Açma'ya tıklayın.
- Tıklayın
 silmek istediğiniz SSO profiline karşılık gelir.
 - Click'Delete' in the confirmation popup to remove the SSO profile.
Deleting the SSO profile will remove Single Sign-On for all technicians linked with this profile and they will have to use their registered email and password for login.
To disable SSO for a technician,
- Login to HelpDesk via web browser and go to the 'Technicians' tab.
- Hover on the technician you want to edit and click .
- 'SSO'yu Etkinleştir' onay kutusunun seçimini kaldırın.
- 'Kaydet'e tıklayın.
Bir kullanıcı için çoklu oturum açmayı devre dışı bırakmanız durumunda, kullanıcının hesabı için yeni bir parola belirlemesi gerekecektir. Bu işlem tamamlandıktan sonra, kullanıcı oturum açmak için e-posta adresini ve yeni parolasını kullanmalıdır.
Evet, SSO için kendi kimlik sağlayıcınızı aşağıda açıklandığı gibi bir dizi parametre ile birlikte yapılandırabilirsiniz:
- HelpDesk uses SAML2 with the HTTP Redirect binding for HelpDesk to IdP and expects the HTTP Post binding for IdP to HelpDesk.
- SAML ile yapılandırma yaparken aşağıdaki URL'leri kullanın ve değişiklikleri kaydedin.
- Single sign on URL:
https://www.remotepc.com/rpchd/sso/process - Audience URL (SP Entity ID):
https://www.remotepc.com/rpchd/sso/metadata
- Single sign on URL:
- Kimlik sağlayıcınız SAML iddiasını mı, SAML yanıtını mı yoksa her ikisini birden mi imzalamak istediğinizi sorabilir.
To login in to SSO enabled account via desktop,
- Oturum açma ekranında 'Çoklu Oturum Açma (SSO)' seçeneğine tıklayın.
- Enter 'Email Address' and click 'Login'. You will be redirected to IdP web login page.
- Kimlik bilgilerini girmeniz istendiğinde IdP'de kayıtlı kullanıcı adı ve parolayı girin.
Upon successful validation of identity, you will be prompted to go back to the desktop application and you can now continue using your HelpDesk account.
Masaüstü üzerinden SSO etkin hesapta oturum açmak için,
- Oturum açma ekranında 'Çoklu Oturum Açma (SSO)' seçeneğine tıklayın.
- 'E-posta Adresi'ni girin ve 'Giriş'e tıklayın. IdP web oturum açma sayfasına yönlendirileceksiniz.
- Kimlik bilgilerini girmeniz istendiğinde IdP'de kayıtlı kullanıcı adı ve parolayı girin.
Upon successful validation of user identity, you will be prompted to go back to the desktop application and you can now continue using your HelpDesk account.